News
May . 06, 2024 17:40 Back to list
Creating a Strong Wire Rope Connection: Clip Installation Guide
Creating a Strong Wire Rope Connection: Clip Installation Guide

Wire ropes are one of your most versatile options when you need to lift, secure, remove, or support items safely. However, you need to know how to install wire rope clips properly. Otherwise, you increase the risk of injury and property damage during construction. One improperly installed wire clip could cost you thousands of dollars in legal compensation.
Southeast Rigging shares a detailed guide to wire rope clip installation.
Needed Materials
You will need the following materials:
- Wire rope
- Wire rope clips
- Tape measure
- Marker
- Seizing tape or wire
- Torque wrench
Ensure you get clip sizes that match your wire rope’s diameter. If they’re too big, the rope could slip out. If they’re too small, the rope just won’t fit.
Installation Steps
Follow these steps to ensure a strong connection for your wire rope.
1. Prep for Assembly
Seize the end of the wire rope with tape. This will keep the strands together and maintain their structure. If the rope has any unraveled or kinked parts, cut these off after seizing.
If you’re using a thick wire rope or need the assembly for critical, heavy-duty loads, use a thin wire to seize it instead.
2. Measure the Turnback
The turnback is the portion of the wire rope running from the base of the eye to the dead end. The appropriate length of turnback depends on the type and size of the clips. For example, 1/8” U-bolt clips need a turnback that’s 3 1/4” long. Follow the manufacturer’s recommendations and mark the end of the turnback closer to the eye.
Next, create your assembly’s eye and make a mark on the live end in the same place where the turnback mark is. Finally, mark your wire rope’s live end where the dead end is.
3. Applying Wire Rope Clips
When applying clips, remember to put the saddle on the wire rope’s live end.
Line up the markings you made in the previous steps and apply the first clip near the dead-end. Space it one saddle length away from the dead end and tighten the nuts. Follow the manufacturer’s recommended amount of torque.
If you’re using a vinyl-coated wire rope, you need to strip the coating off where you will install the clips. You may also opt to keep the vinyl if corrosion resistance is valued over strength. However, this should never be used for critical applications.
Apply the second nut to the other end, near the eye. Make sure to remove any slack in the wire rope as you do this.
If your assembly requires three or more clips, space them evenly. If you measured your turnback correctly, the clips should be six wire rope diameters away from each other.
4. Seat the Components
Once all the clips are in place, you need to seat all the components by doing a first load. Load your assembly with a load equal to or greater than what you’ll use it for. Unload it, then inspect and re-torque the clips. Your assembly is now ready for use.
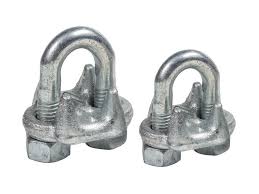
Din 741 Malleable Wire Rope Clips
Common Mistakes to Avoid
Avoid these common mistakes when creating your assembly to ensure its strength.
Saddling a Dead Horse
“Never saddle a dead horse” is a well-known saying when making a wire rope assembly. It’s a reminder not to place the saddle of a U-bolt clip on the dead end. Using an incorrect clamping method on your wire rope will cause the clips to crush the live end of the wire rope, weakening it. You don’t need to worry about this if you’re using double-saddle clips.
Inappropriate Amount of Torque
Manufacturers set a recommended torque level for their wire clips. Too little torque can cause the wire rope to slip through the clips. Over-torquing may damage the threads, compromising the rope’s strength. That’s why you need a torque wrench, as it tells you how much you’ve tightened a clip.
Not Using Enough Clips
Wire ropes require a minimum number of clips depending on their thickness. Typically, the greater its diameter, the more clips it will need. Wire ropes with a diameter of 1/8” to 7/16” require a minimum of two clips. Thicker ropes will need three or more.
Incorrect Spacing Between Clips
As said before, the space between the clips should equal six times the diameter of your wire rope. If you plan to use more than the minimum number of clips, you should lengthen your turnback accordingly.
Insufficient Turnback Length
If your assembly has less than the recommended length of turnback, you’ll decrease its efficiency. This may then lead to failure. There’s no significant downside to creating a longer turnback, but you will shorten your wire rope.
Wrong Type of Clip
Malleable cast iron wire rope clips should only be used for non-critical uses. They can fracture under heavy use. For critical, heavy-duty applications, use forged steel wire clips.
Failing to Retighten the Clips
Monitor the torque on your assembly’s clips. They will loosen with repeated use. If you don’t retighten them, they will eventually fail, possibly causing injury.

